Materials Needed:
- freezer paper for making templates
 6" x 15" flesh colored fabric for head, feet, hands
- 22" x 18" (fat quarter) print for body, sleeves, skirt
- (or you can create a contrasting skirt with another fabric)
- 4" square gold ultra leather or thin vinyl for sandal bottom
- 14" of 1" wide Cluny Lace for collar and sleeves
- 12" of 1-1/2" wide wired ribbon for halo
- 4" of 1" wide gold trimmed lace for slippers
- 14" of gold trim for belt and sleeves
- matching threads
- 2 pipe cleaners – 12" each
- 14 tablespoons of plastic weighting pellets
- button and carpet thread for joining arms
- 2 - 6mm and 2 size E seed beads for joining arms
- 3.5" needle for jointing
- fiberfill
- yarn or mini curl doll hair for hair
- fine line permanent markers (Micron Pigmas or Gelly Rolls) black, brown, pink
- colored pencils for lips and "eye shadow"
- powder blush
- white acrylic paint
- plastic lid for inner soles
- Set your machine to make small stitches for strength. Back stitch at the beginning and end of each seam to prevent it from coming apart when pieces are turned.
- RST = right sides together
- RSO = right sides out
- Click HERE for Pattern.
Trace the body, 2 arms and back head onto the dull side of freezer paper. Be sure to include all of the pattern markings. Cut out the templates and iron them shiny side down to the wrong side of your folded fabric. Sew around the paper, then lift off. The templates can be reused quite a few times.
| Body: Iron body template to wrong side of folded body fabric. Sew around, leaving open where indicated. Remove template and cut out pieces forming a scant 1/4" seam allowance. Clip curves, turn body right side out and stuff firmly. Sew opening closed. |  |
  |
|
|  |
 Trace face pattern onto the dull side of freezer paper. Iron the shiny side of the paper to a rectangle of the face fabric. Do not actually cut out the face until you are finished coloring it in. Use a light source to lightly trace the features onto the face fabric either with a mechanical pencil or brown pigma pen.
- Color in irises with desired color. When the color has dried, outline the iris with a darker color or black.
- Optional: Add some white on either side of the iris.
- Add the pupils with black paint or pen then draw a line over the eye and add a few lashes.
- When the eyes have dried you can color in some eye shadow with colored pencil. Deepen the line of the eyelid by adding more brown pigma.
- Form the eye brows with tiny strokes in a color to match the hair.
- Outline the lips, then fill them in with color of choice making the top lip darker than the bottom lip.
- Use white paint to add the "life lights" by making a tiny white dot on the upper left side of each eye, and stroke a line on the right side of the bottom lip.
- Use a Q-tip or small brush to apply powder blush to cheeks.
 Iron back head template onto wrong side of folded face fabric with the template placed on the bias. Sew the center back seam leaving an opening where indicated. Keeping the template on the fabric, cut out back head along the side edge of the pattern and a scant 1/4" away from the center back seam. Remove template and baste down seam allowance around back opening.
 Sew face to back head RST leaving it open at the top. Turn RSO. Stuff head firmly. Gather up top raw edge with doubled thread and knot off securely. Add more stuffing through back of head if necessary.
- Insert neck into back head opening and securely stitch the head to the neck.
- Sew or glue ruffled lace around neck to create a collar. Sew more ruffled lace around bottom of sleeve to cover the seam where the hand joins the sleeve.
- Sew or glue gold trim over the gathered edge of the lace on the sleeves. Add gold trim at the waist to cover the gathering stitches and create a belt.
- Add a button brooch, ribbon bow, or lace motif to the neck to finish the bodice. You can also add tiny gold beads to create a button-down blouse look.
|    |
 | Attach arms to angel by securing a doubled upholstery thread with a tail on one side of the body at shoulder. Bring thread through the body, through an arm, through the gold bead, through the E bead, back through the bead, through the arm and body and the second arm, through another bead and E bead, and back through the bead and arm. Pull thread tight and knot it to the original thread tail. Bury thread ends in doll. Decorative buttons could be used in place of the beads. |
- If using mini curls, rub them between hands to make them fuller and remove some of the shine. Place glue on the head and press curls in place. You may wish to use a little glue to keep the hair against the sides of the head.
- If using yarn, create a multiple yarn loop twice as long as finished hair. Tie in middle. Glue to head and arrange as desired. You can add a yarn braid, twist in a bun, or leave long and loose.
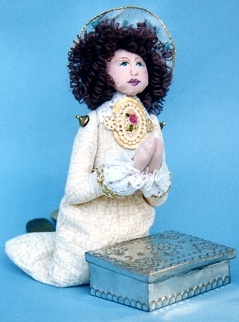
Using your 12" wired ribbon, gently pull one wire from both ends until ribbon is tightly gathered. Twist ends of wire together to form circle. Glue or sew in place on back of head. Posing the Doll: To place the angel in a kneeling position, fold the skirt under just before it bells out making sure that there are pellets above and below the bend. She can also be seated. Hold her upside down so that some of the pellets go around her hip area. Just have fun playing with her for a few minutes until you find the position you like best.
No comments:
Post a Comment