Materials:
- FIMO Soft Polymer Clay - 2 oz. package each of: Caramel, Sahara
- 12 x 12 sheet of burlap fabric - natural
- Small piece of burlap fabric - white
- Dark brown embroidery thread
- 12 x 12 Quilt batting
- Purchased wooden frame
Tools:
- AMACO Beveled Edge Cutters - Dog Set
- AMACO Pasta machine or PolyRoller
- AMACO Polymer Clay & Craft Oven
- Small sheet of coarse sandpaper
- Needle
- White porcelain tile work surface
- Rubber stamp - alphabet
- Permanent black ink
- Fabric glue
- E6000 or similar glue
- Tissue blade
Instructions:
- Condition both clays separately until they are at a workable consistency. Roll the clay through the pasta machine (or the PolyRoller) so you have a sheet approximately 1/8" thick. Using the clay shapes cut four footprints from the Caramel clay and cut the inserts for the footprints using the Sahara color clay. You will need four foot pad shapes and 16 toe pad shapes.
- Cut two dog house shapes one from each of the Sahara and Caramel clays. Cut three "bones", two from the Sahara clay and one from the Caramel clay. Use the "WOOF' stamp to press the word "WOOF" into the surface of the Sahara color dog house. Bake this shape by itself in the Polymer Clay & Craft oven according to clay manufacturers instructions. Allow to cool.
- Work a small amount of the Caramel color clay into the impressed WOOF in the dog house until the impression is backfilled with the clay.
- Using the dog house cutter, cut the roof from the still raw Caramel dog house. Place the Caramel color roof in place on the dog house and set aside for baking.
- Assemble the dog paws by placing the Caramel colored paws face up on the work surface. Place the foot and toe pads in position on the paws so they are layered on top of them. Use the sandpaper to lightly press a texture into the top of the pads.
- Using the sandpaper, texture the surface of the dog bones.
- Press rubber stamp letters to spell out "My Best Friend" followed by your dog's name on the bones, using dark brown or black ink on the stamps to ensure that the text can be easily read.
- If necessary, touch up with the sandpaper any places where you have pressed too hard and damaged the texture.
- Bake all shapes in the Polymer Clay & Craft Oven according to the clay manufacturer's instructions.
- Disassemble the frame and set the glass and backing aside. Trim the quilt batting to the shape of the frame, cutting it 1/4" smaller than the outside dimensions of the frame and cutting the hole " larger than the opening in the frame.
If you place the batting over the frame you should be able to see the outside edge of the frame and the edge of the opening too.
- Cover the front face of the frame with fabric glue and adhere the quilt batting to the frame. Set aside to dry.
- Cut the burlap into four rectangles that you can piece together to cover the frame. Allow sufficient extra fabric to wrap around the edges of the frame and allow enough so the burlap edges will join easily. Cover the quilt batting with fabric glue and extend the fabric glue around the sides and across the back of the frame where the burlap will need to be glued. Adhere the burlap over the top of the quilt batting.
- You may find it easier to do this in sections working one section at a time and hold the burlap against the fabric glue until it is set - this should only take a minute or two. This way you can ensure the burlap is stretched and doesn't crease. Continue until the frame is covered.
- Cut two small squares of white burlap and one small square of natural burlap. Thread the needle with three strands of embroidery floss and stitch a rough square around the inside of the burlap squares. Fray the edges of the squares and then adhere the burlap squares to the frame using fabric glue.
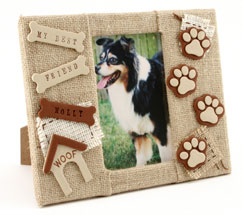
- Finish by adhering the clay shapes to the frame using the finished project as a guide and using either E6000 or more fabric glue.
- Reassemble the frame - you can place the glass back into the frame or leave it out as desired. Trim a photo of your pet to the correct size for the frame, place the photo in position and replace the backing on the frame.
No comments:
Post a Comment